*This Guest Blog was written by Sienna Cherrico, wife and better half of Joel Cherrico. Sienna is the Office Manager at Cherrico Pottery, and an Artist who makes paper by hand. This blog post tells about her process of creating handmade paper. You can also watch a video of Sienna’s paper making process on Facebook here. Some technical words are bolded and defined in a glossary at the end of the post.
Why I Find Papermaking Therapeutic
As I sit to begin writing this post, by hand, on paper, I am watching the rain fall and drips splash in the puddles. A perfect reflection of how I view the papermaking process. Respecting the pace at which water drips.
I have loved paper, in the form of books, journals, sketch pads, and cards or stationary for as long as I can remember. My mom is an artist and when I was young she made paper castings. She would get paper pulp1 from the local paper mill in five gallon buckets. Then, she would design and carve her own molds from foam insulation boards. Pulp was pressed into the molds with a sponge, trying to remove as much water as possible, for it to air dry. When dry, she would artistically paint the castings to be hung in people’s homes.
Hence, I grew up with my hands in pulp. I got to help my mom create these forms, while watching the water absorb into the sponge, as the fibers in the pulp formed together.
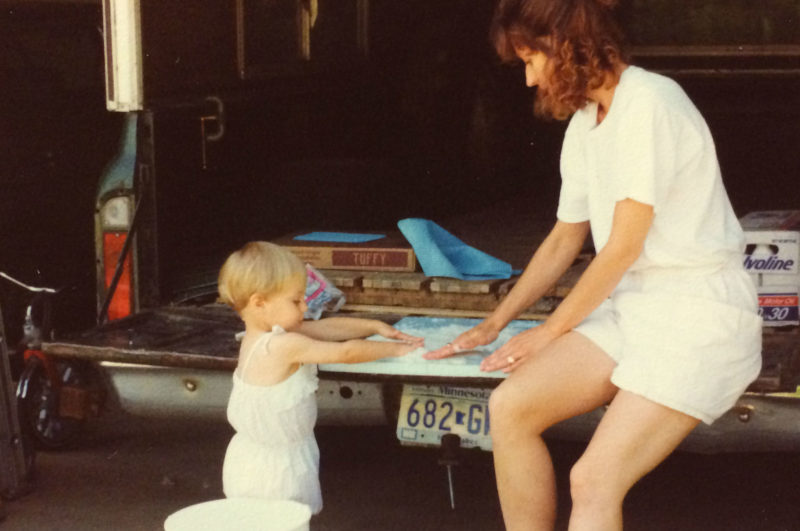
(My mother showing me the process of paper casting)
So, when many years later, as a senior art student in college, I was introduced to papermaking I instantly fell in love. The process nostalgically brought me back to my childhood.
Only now, I was learning to manipulate the pulp into forming sheets of paper, and out of local plant material!
When an art form is a direct product of the earth, it is so much more powerful to me. Your body is so involved in the process, from collecting and preparing the fibers to forming each sheet. It’s a healing process for me, my mind is free to wander and my body is so familiar with the process that I get in a calming rhythm. I feel connected to the earth in my own way through this bond of plant fibers and water.
A Brief History Of Papermaking
Humans have been writing and documenting for centuries, perhaps since the very beginning of time. Before paper was invented, people wrote on bones, monuments of stone, papyrus, wood, metals, leaves, and bark from trees. Parchment was used in both Europe and Asia Minor, made from sheep skin, as early as 1500B.C. The true origin of paper has been disputed, an emperor in China was credited in A.D. 105. However, historians have found fragments of paper made from hemp in China that came from nearly two centuries earlier. In the year A.D.615 the papermaking process spread to Japan and finally to Spain in Europe by 1151. The first paper mill was built in England around 1488. Papermaking became westernized and reached the United States, through a German Immigrant in Pennsylvania, in 1690.
In Asia many of the materials that were being used to make paper were bamboo, silk, tree bark, and other plant materials. When papermaking reached Europe they began making paper out of old recycled cotton rags, as the source was abundant at that time and eliminated the steps of harvesting and breaking down the plant fibers. The process of creating pulp started with mallets. A person would beat the fibers with a mallet until they broke down. Then in 1680 in Holland a beater with a motor and rotating blades that could be lowered to break the fibers into pulp was invented, the Hollander beater, and changed the process forever. This beater and ones similar are still being used today for hand papermaking. Papermakers have been experimenting with making paper out of plant fibers, usually whatever grows in abundance locally. Artists also began experimenting in the 1960s and 70s with painting and sculpting the paper pulp as they continued to develop custom papers with combinations of fibers for prints. The art of making paper is still honored and enjoyed by many artists around the world, as it creates jobs and preserves the process in developing countries and allows many curious people to try the process through community courses and visiting artist’s studios. The variety of ways you can make paper and then what you can use it for is endless, there are so many creations yet to be discovered and made. Here is a closer look at the entire process, on a larger scale.
The Process
To understand basic steps for making paper, I broke them down into 6 simple steps:
- Selecting fiber
- Preparing fiber
- Beating the fiber into pulp
- Sheet forming
- Pressing: squeezing out all the water out
- Drying
I had to leave out many nuances that other papermakers would surely notice. But for the first time reader, I hope to make sense of the process through these basic steps.
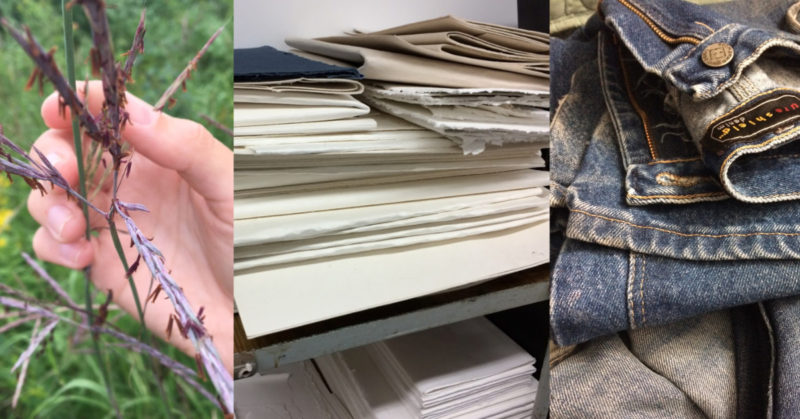
#1) Selecting Fiber
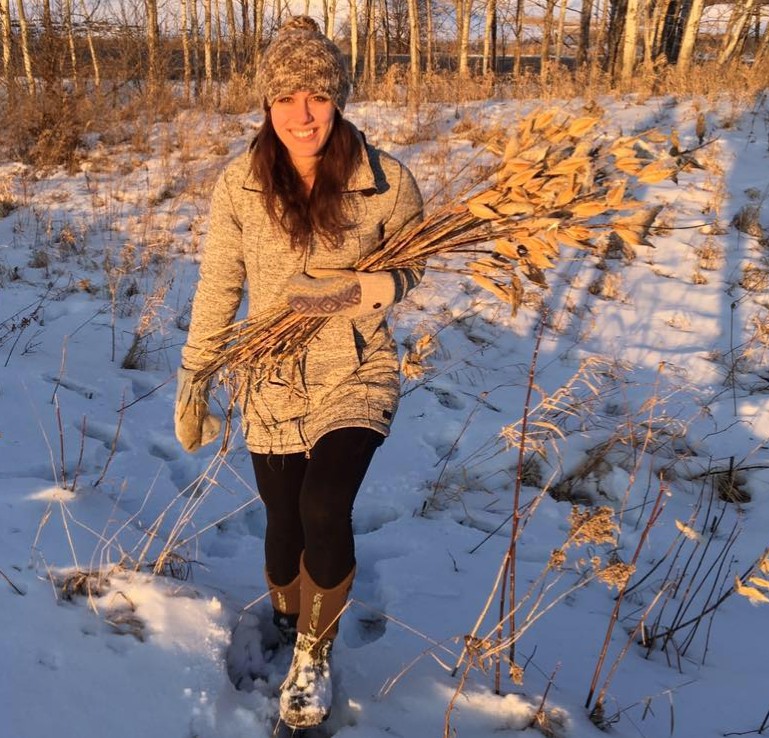
Let’s start with selecting your fiber. The options are; recycled materials (old cotton jeans or rags), plant material (cellulose-grass, stem, or leaf fibers), or half-stuff2 (either plant or recycled material already processed once in a larger factory). Personally, I often use abaca3 half-stuff and incorporate my own local big bluestem grasses since a local touch is important to my personal artistic style.
#2) Preparing Fiber
To prepare the grasses, they are first harvested from a prairie or garden, and then cut down into one inch sections. You must avoid knots and seeds, then set the fibers in large pots of water to boil.
Once the fibers have broken down enough where they can be pulled apart, usually after at least 3 hours of cooking, they are done. They are then rinsed until the water runs clear. If using half-stuff, most varieties just need to soak for a few hours prior to beating.
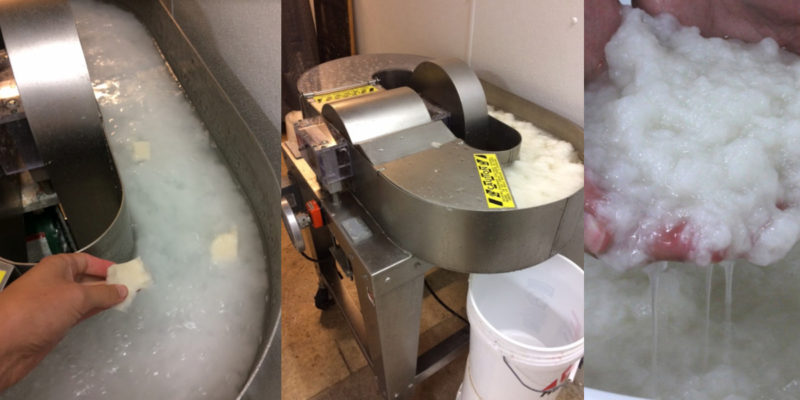
#3) Beating Fiber Into Pulp
Now it is time for beating, which turns the fibers into pulp. The beater is a machine that is filled with water and when turned on, the fibers are added. The blades are slowly lowered and the fibers undergo fibrillation4 changing from their native shape to microfibers. When the pulp is cloudy, without knots or strands, it is finished. Beating can take anywhere from 3-8 hours.
#4) Sheet Forming
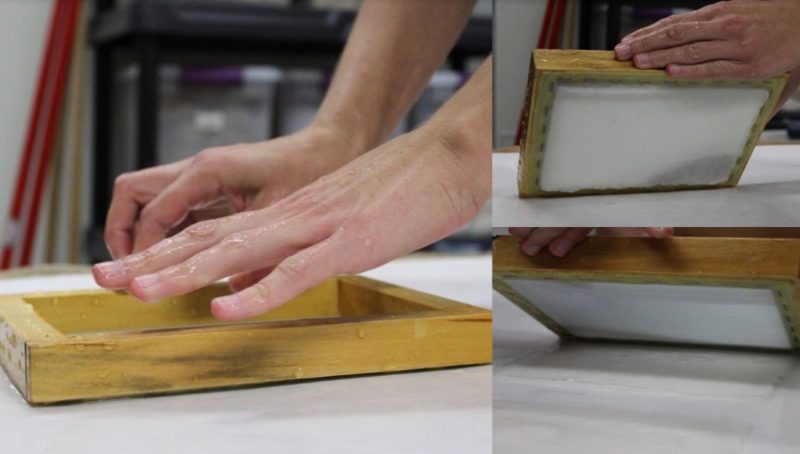
Sheet forming is the most active and demanding step of the paper making. A vat5, which is any sort of basin that’s at least 18” deep and 24” wide, is filled with about 4” of water. I start by adding roughly four quarts of pulp and many pinches of lightly beaten grass, as inclusions that randomly scatter the paper to add interest. With my hands, I stir the fibers in the water, this is called charging the vat.
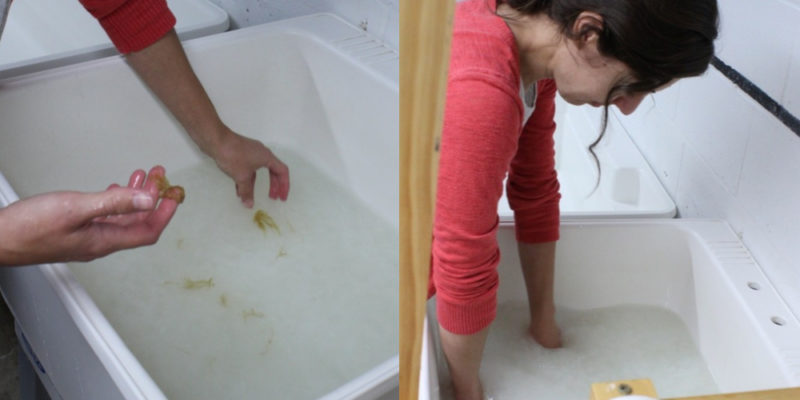
Next, I dip a mould6 and deckle7 into the vat. The size of the mould and deckle determines the size the sheet of paper will be. Once the vat is charged, I slide the mould and deckle into the moving fibers at an angle and lift it carefully in one fluid motion.
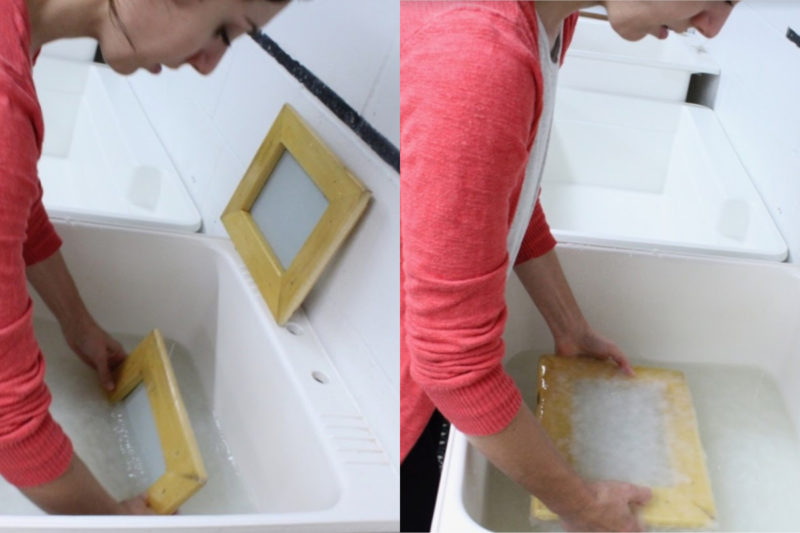
As soon as it leaves the water, keeping it level, I gently, but quickly, move the mould and deckle back and forth and front to back. This helps create an even sheet, as the water drains and the fibers undergo hydrogen bonding8 (weaving together) to form a very strong piece of paper.
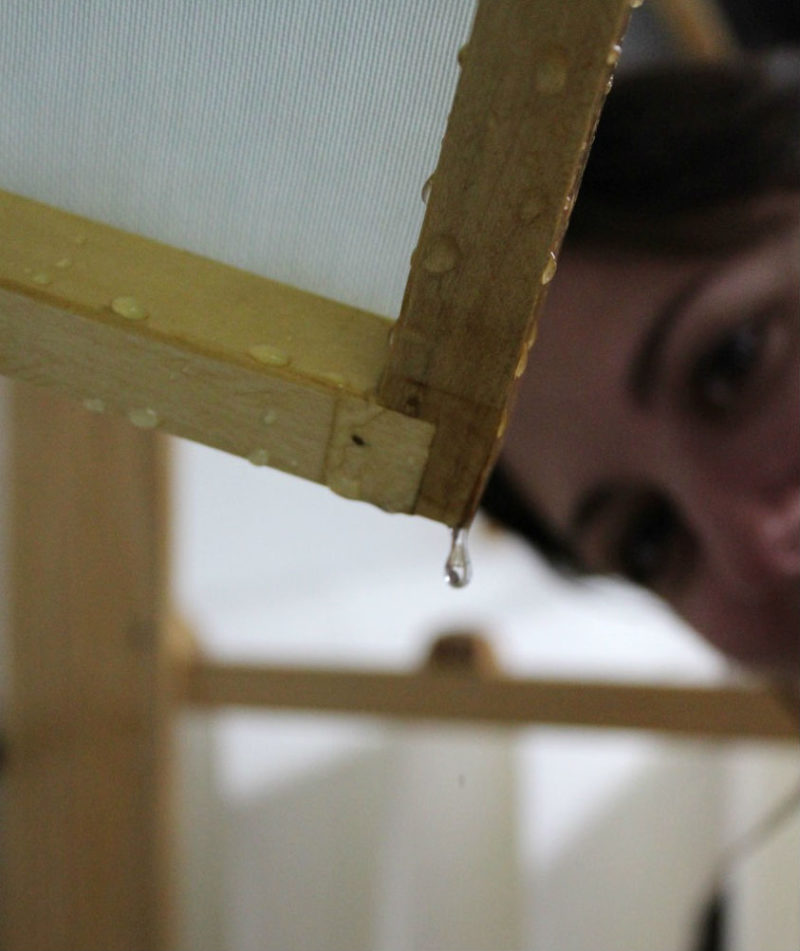
When the water stops moving, the fibers stop moving too. This is the most fragile stage for the fibers. If they are tilted too soon, touched or have a water bubble, the sheet will be uneven or have visible indentations. When most of the water has drained out of the fibers through the screen of the mould, I carefully take the deckle off and hold the mould with the fibers at an angle, watching the water drip off the corner. Once there is a pause between drips, it is ready for couching9. This is the stage where I am literally waiting and moving at the pace the water drips.
Layers of wet felt and pellons10 are set up to hold the fibers in place as they are transferred from the mould in the process of couching. Lining the mould up with the edge of the pellon or previous sheet of paper, I roll the mould down and press the fibers onto the pellon. As the mould lifts up, the paper fibers release onto the pellon and the mould is now clear.
I continue this sheet forming process, adding pulp to the vat every six sheets or so, until all the pulp is gone. Now a stack of pellons and fragile fibers in the form of sheets create many layers ready to be pressed.
#5) Pressing: Squeezing Out All The Water
Sliding the stack of pellons carefully into the press, I pump the press to 2000 pounds of pressure. Water gushes out the sides pouring onto the floor and down the drain. 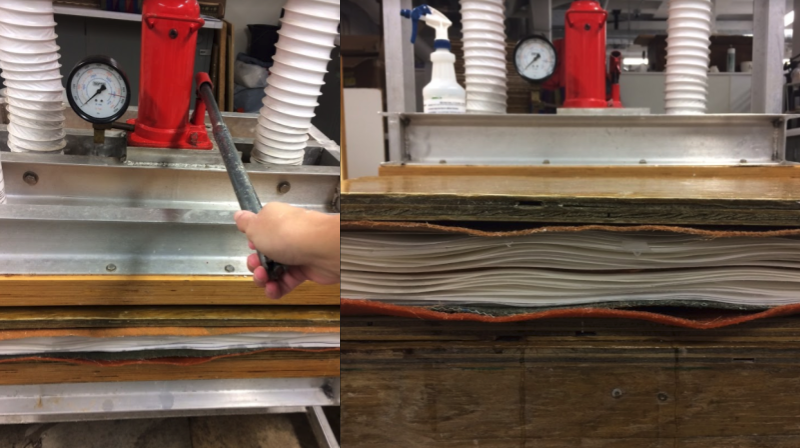
After 20 minutes I apply even more pressure, up to 4000 pounds, for 5 minutes. This forces the fibers to hold their bond since most of the water has been removed and be able to be picked up, before it is set to dry.
#6) Drying
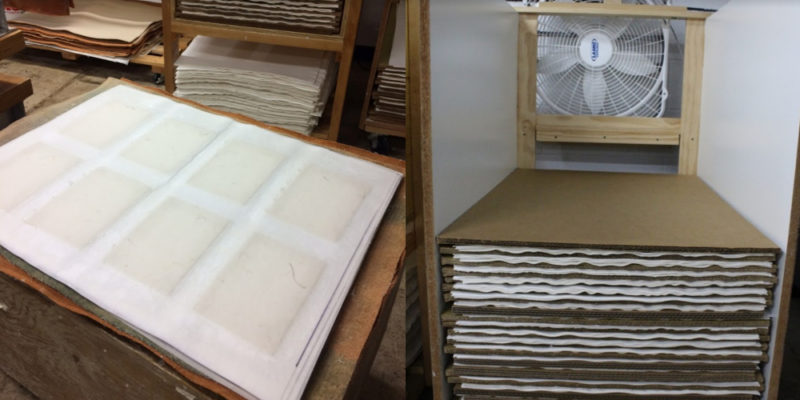
Once out of the press, I pull off the layers of pellons one at a time, transferring each sheet of paper to the blotters11 of the drying rack, sandwiched between sheets of cardboard. The cardboard allows air from the fan to move through the stack of paper and blotters as the sheets are forced to dry. About two days later, I come back to the studio to turn off the fans and again, layer by layer, reveal the now dry and finished sheets of paper.
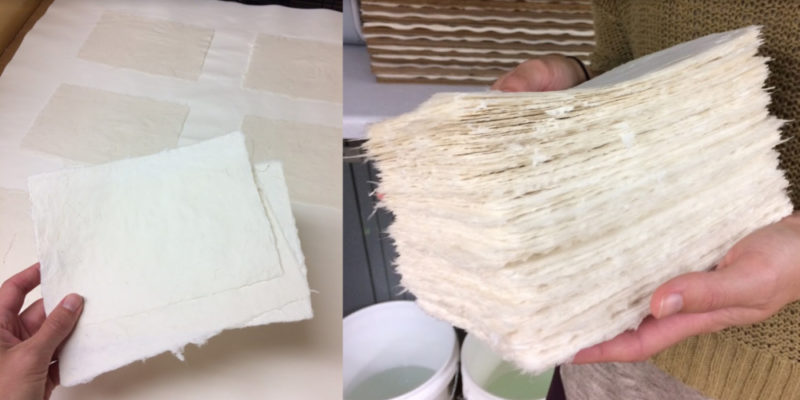
Handmade paper appears to be so delicate with the deckled edges and beautiful textures, when in reality it is some the strongest paper that exists.
Out my window the rain has now stopped, yet a few drips continue falling from the trees. I like to think about these drips growing the grasses that I will go harvest and bring to the studio to again mix with water to bond with the body and the earth in a new form. So we may communicate as we write to loved ones, on paper, and sit and watch the rain fall into puddles, one drop at a time.
Our Collaboration: Why we chose to make this kind of paper for Cherrico Pottery Patrons
I made abaca paper with big bluestem and reed canary grass inclusions for this project because it’s a lovely rendition of the common papermaking process and incorporation of local materials. We needed paper to clearly showcase the Cherrico Pottery logo, painted with India Ink by Joel, in a unique way. Abaca is made of the fibers from the stem of the banana plant, typically sourced from the Philippines. It’s a strong and predictable fiber that can be manipulated by how long it is beaten in the process of becoming pulp. The longer it is beaten, the stiffer it dries and even has a shrinking quality. When making larger quantities of paper, we use a fiber source like half-stuff so that the quality of the paper can be consistent over 1000 sheets. But I wanted to incorporate a local material as well, which is why I chose to harvest and include grasses from the prairie two miles from our home. It gives a personal touch and when you look at the paper you can think about the story of that grass and the process of how it got to your hands.
Glossary:
 1) pulp: the result of plant fibers being turned into a viscous, cloudy looking slurry.
2) half-stuff: plant material that has been pre-processed in a factory and are purchased from a supplier. They need to be rehydrated before beaten, versus processing the raw plant material. Common “half-stuff” materials are: abaca, cotton linter, hemp, sisal, and flax.
3) abaca: a bast (taken from the inner bark of plants) fiber from the leaf stalk of a type of banana tree found in the Philippines and South America.
4) fibrillation: act of changing the structure of the fiber from its native shape, refining it to delamination and microfibers.
5) vat: a tub or container to hold your slurry of water and pulp.
6) mould: screen surface, similar to a window screen, stretched on a frame.
7) deckle: a second frame with an opening that sits or fits onto the mould, creating edges to hold the fibers.
8) hydrogen bonding: hydrogen & oxygen atoms and water are attracted to each other through similar polar charges and attach like magnets, through the process of bonding, and hold water and the fiber molecules together.
9) couching: the fluid act of transferring the fibers of a sheet of paper from the mould to felts or pellons.
10) pellon: a sheet of non-woven polyester cloth with absorbent qualities to hold and help release the fibers from the mould. Pellons are usually cut to the size of your press so that everything fits together.
11) blotter: a large sheet of processed cotton that is absorbent and acts as a barrier between the paper and the cardboard in the drying process.
Resources:
Notes from my college course in the fall of 2011 at the College of Saint Benedcit/Saint John’s University Art Department
“The Papermaker’s Companion; The Ultimate Guide to Making and Using Handmade Paper” by Helen Hiebert
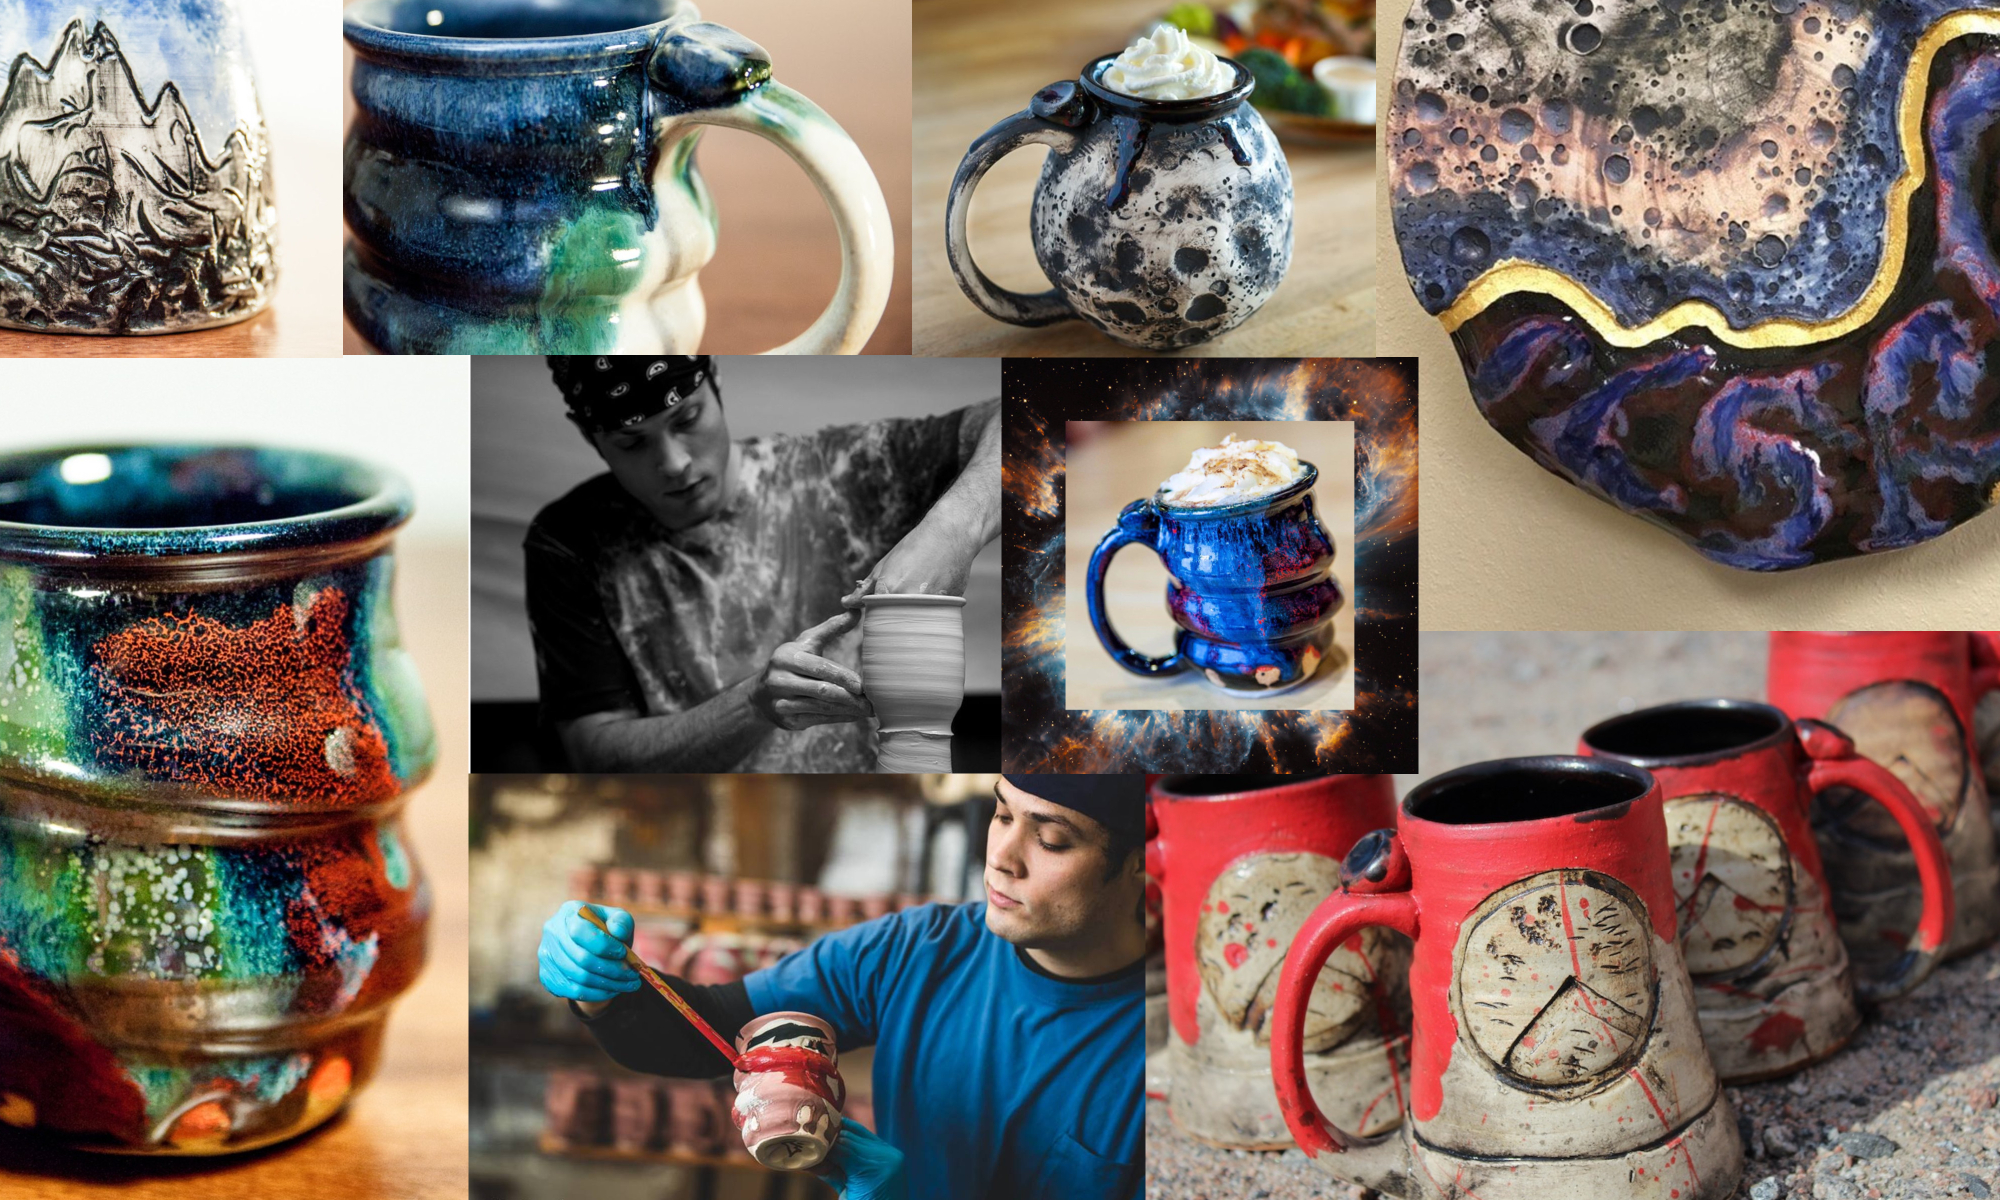
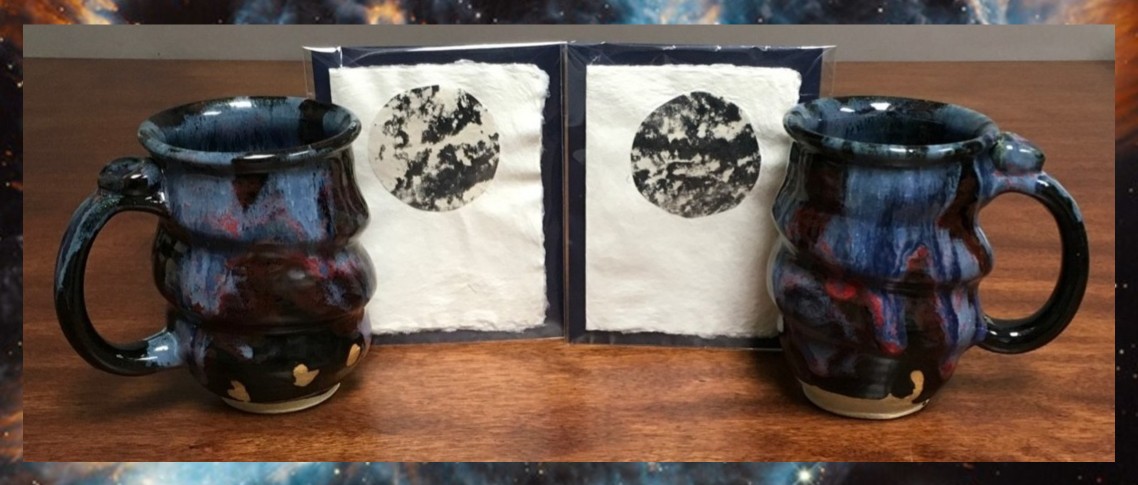
BONUS: Handmade Paper and Pottery Giveaway, $418 value
Giveaway, no purchase necessary: 2 people will each win one of Sienna Kuhn’s handmade paper Moon Cards ($29 value) paired with one of Joel Cherrico’s “Cosmic Mugs” ($180 value: $165 + $15 S&H average), totally free! To enter, leave a comment on this blog post before 1pm CST March 8th, 2019 responding to the following question:
What is one important thing that you learned about the art of making paper?
Simply leave a comment before 1pm CST Friday 3/8/2019 telling us one important thing you learned from this blog post. The Cherrico Pottery Team will select 2 different people to win. Each winner will get one of Sienna Kuhn’s newest handmade “Moon Cards” ($29 value) paired with one of Joel Cherrico’s “Cosmic Mugs” ($180 value: $165 + $15 S&H average), shipped almost anywhere globally, totally free!
To enter, you must leave one, genuine comment on this blog post, or the moderator will not approve your comment or include you in the giveaway. Please use your PERSONAL name or initials and not your business name, as the latter comes off like spam. Please allow up to 48 hours, or sometimes even a bit longer, for the moderator to approve your comment. Limit one comment entry per person. Void where prohibited, over 21 years of age only. We will pick winner Tuesday 3/12/2019 at the latest (Sienna Kuhn is currently scheduled to choose winners around 1pm Friday 3/8/12 and we will try to make this deadline and announce winners on Facebook Live around 2pm Central that same day) and winners will also be notified via email.
The winners will receive the gifts shipped to them nearly anywhere globally. You can view more details at the Cherrico Pottery Giveaway Policy here or the Cherrico Pottery Terms and Conditions here. If you have any more questions or concerns, or please reach out to Joel Cherrico, anytime at our email here: contact@cherricopottery.com