The Nuka glaze originated in Japan centuries ago. Potters traditionally made the glaze by using ashes from burnt rice hulls. These ashes were high in Silica, which is a glass former, so some Nuka glazes could be made with almost entirely ash.

Phil Rogers describes the Nuka glaze in his book “Ash Glazes” along with a huge variety of other glazes. I learned many of my glazing techniques from this book, like creating custom glazes from raw materials which is how I develop all of my glazes.
Check out the awesome Nuka glazed bottle below, made by Japanese folk potter Shoji Hamada. He was renowned for making skillfully crafted pottery inspired by his natural surroundings, and made with natural materials that he harvested locally. This Nuka was made with 50/50 ash and stone, and a black Tenmoku was brushed over.

Ash as a Glaze Ingredient
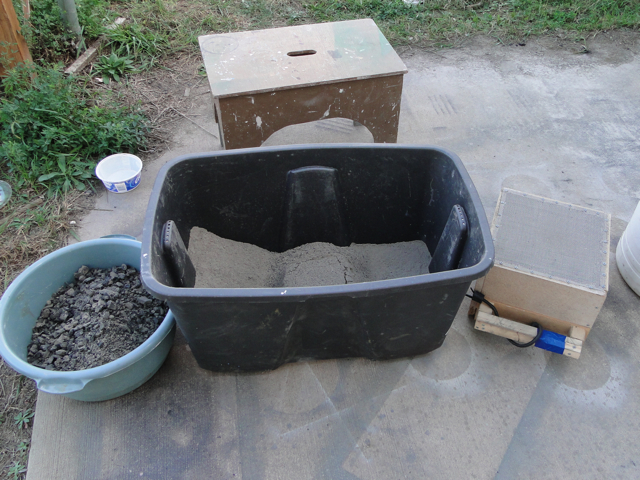
Every other year, I pick up about 200 gallons of wood ash from my friend who heats his family’s home with wood furnace. He harvests most wood from deadfall trees in the St. John’s Arboretum. I like using this ash because it’s a natural material that I can get from a local waste source. It’s also free, but takes a lot processing to get rid of all the charcoal and debris. The image below shows some tools I made to sift the ashes through 12, and then 40 mesh screens.
Developing Glaze Recipes
I’ve spent about three years developing recipes for my Nuka glaze. Technically, it many not be a ‘Nuka’ anymore due to all the materials I’ve added. I still call it a Nuka because I’m inspired by the materials and surfaces used historically, but my glaze has become pretty complex.
Traditionally, Nuka glazes were fired hotter than most glazes. While I was still in school at CSB/SJU, my professor Sam Johnson and I got great results with the Nuka when firing upwards of cone 12, or over 2500 degrees F. Since graduation, I’ve lowered the temperature to cone 10, or just under 2400 degrees F. I did this by using line blend testing. I could write another blog post on line blend glaze testing, so for now I’ll just refer you back to Phil Rogers, “Ash Glazes.”
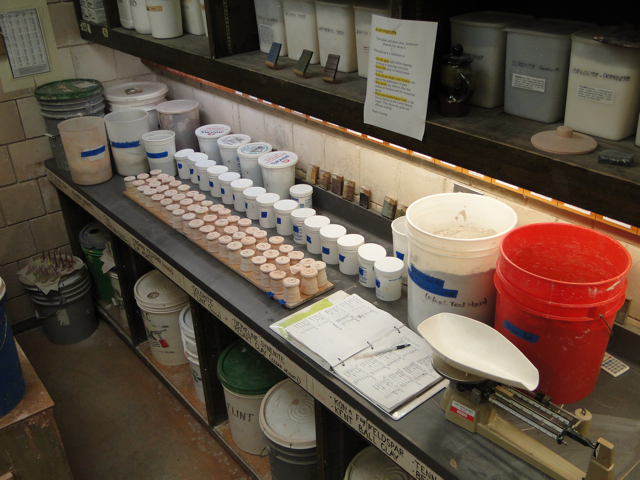
For all you potter readers, here’s my Glossy Nuka glaze recipe for cone 10. If you dry-sift ashes through a window screen you could probably get similar results. I keep this glaze at about 145 specific gravity to keep it from dripping off the pots:
| Glossy Nuka | Parts | Percentage |
| Wood Ash – dry sifted | 33 | 18.5 |
| Custer Feldspar | 50 | 28.1 |
| Silica (325 mesh Flint) | 30 | 16.9 |
| Frit 3134 | 15 | 8.4 |
| Whiting (High Purity) | 20 | 11.2 |
| Bone Ash | 10 | 5.6 |
| Bentonite | 10 | 5.6 |
| Talc | 10 | 5.6 |
| total | 178 | 100.0 |
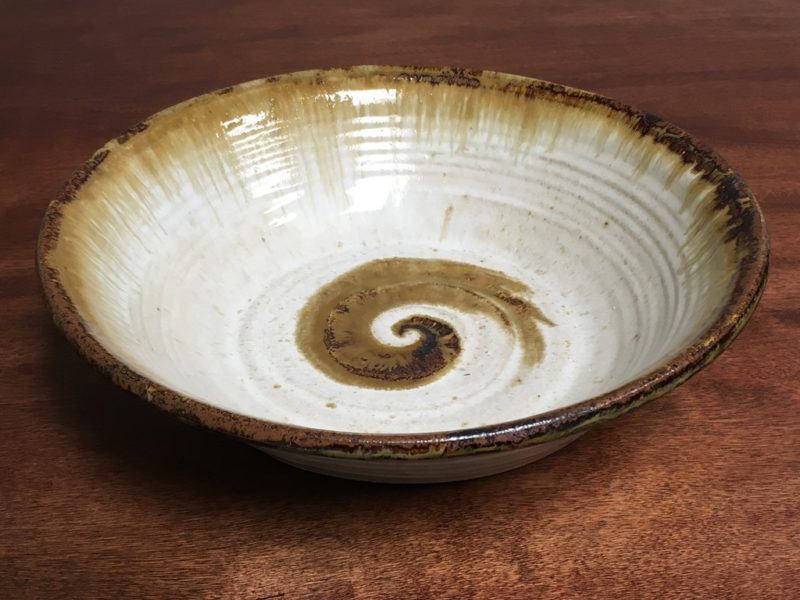
Brushing Iron and Cobalt
I accent each pot with iron or cobalt washes on the rim. These naturally drip down each pot during the firing, creating a surface that reminds me of wet paint. I like to think of each pot as a canvas for glaze. The cup on the left was also electric fired at cone 10, while the mug on the right was gas fired. I think that the extreme oxidation of the electric kiln contributes to the crystal growth in the cup, which is highlighted by the iron as yellow specks.


The cups above were gas fired at cone 13, back in 2011. This is one of my favorite versions of the Nuka because of the glossy, milky surface and the color complexity of the iron drips. I’ve spent years adapting my new recipes to reproduce this surface, and I’ve discovered a huge variety of colors and textures within the Nuka color pallet. The lower cone 10 temperature has been a good challenge for this glaze, and I hope to develop a cone 6 Nuka in the near future.
I’m also exploring more ways the Nuka relates to my other 2 glaze choices: Copper Red and Tenmoku:

*Added November, 2016:
To view the most recent evolution of my Nuka Glazed “Standard Ware” pots, including “Nuka Cobalt” and “Nuka Iron” color pallets, view our online store: store.cherricopottery.com/standard-ware

Thanks for the post, wonderful japanese design.
Here, a gallery in Paris, which has nice japanese art pieces.
Thanks for the tips! I’ve got a huge stock of this dry sifted ash, about 25 gallons after sifting. I’m currently trying to fire this at cone 6 electric. Do you have any suggestions for a good flux to add to get this to properly flux without glaze flaws? I used about 20 percent Gerstley Borate, and the glaze fluxed well but I have lots of pinholes, which even started to foam and boil on some pots.
This is actually the reason why small business marketing online is becoming
very rampant. How much do you need to make to take
care of your own financial health and that of your business, and how many hours do you want to work to achieve that number.
Ditto for the too many products annd no waay too sell them.
If you were sold a red Ferrari for A� price (let’s saay $50,000 instead of $100,000) would you ever want to pay full
price for a new one.
Traditionally in Mashiko, Nuka is fired at Cone 8. Mashiko Nami is not good at higher temps. It is found between layers of sand and is very sandy. For modern potters in Mashiko, Mashiko Nami is mixed with Shigaraki Nami to get a body that will fire to cone 10. That’s what the Clay Coop blends. I got my nami straight from the quarry and put it in a cooler part of my wood kiln. Also, it is fired neutral. The Seiji Nuka turns red instead of Green in reduction.
Nuka at other kilns may be different. Many of Hamada’s matt looking glazes are simply underfired.
Also, Mashiko Kaki vitrifies at an even lower temp. It is used as a liner glaze in the cool parts of the noborigama, much like Albany Slip was used. To seal underfired pots.
I want a cosmic mug when ready
The basic ash glaze at Cone 10 is indeed amazing. I appreciate the earthiness of the form and glaze. Have you created the cone 6 glaze? I had thought I could never achieve the look I wanted unless I moved to gas or wood fired until I saw your work in oxidation. Amazing
Being what I would consider a beginner I find I tend to challenge my self maybe more than I should. My studio is located on our ranch. We have large amounts of clay deposits and the local area also has a plateau that has a high quality silica sand. So far the clay fires to Cone 05 as earthenware. I think i’ll Do some experiments with an ash glaze. Our wood stove will supply plenty.Thanks for your outstanding demonstration!
I use equal parts by volume of F4 Kona Feldspar, mixed hard wood ash, and silica with half part of ulexite. I tried other feldspars and pumice but this was the best melt. It takes something like ulexite to melt the glaze properly at Cone 6. https://www.instagram.com/p/BlwQnylAQZB/
The colors come from brushing iron oxide under the glaze (4 parts RIO to 1 part Redart) and pouring the glaze in an uneven manner.
I believe using Gerstley Borate puts you on the right track to reduce the glaze to cone 6. Straight boron might help as well, but it is a strong melter, so be forwarned.
Hi Joel
Many thanks for this recipe. I have been working on it for a couple of years now and have ended up with a very nice (I think!) nuka-like glaze for cone 6 oxidation.
I thought I would pass it back to you since you expressed an interest in a mid-fire version.
It’s here on Glaze: https://glazy.org/recipes/282278